Showing posts with label Christmas. Show all posts

Saturday, October 13

Rag Dolls: CSS Release Day 4


Welcome back to the Clear & Simple Stamps release festivities!  Are you enjoying all the cuteness? Critters, Uglies, and now Rag Dolls.  I know that several of the DT gals are going to focus on fall today with the Rag Dolls... there are lots of adorable things perfect for Halloween and Thanksgiving,  but I decided to jump ahead, crank up the Christmas tunes, crank down the AC (because in Texas it's still 90 degrees), and go for the merry.  Falala!

There is some masking involved in making the scene for the card.  I'll chat you through it:
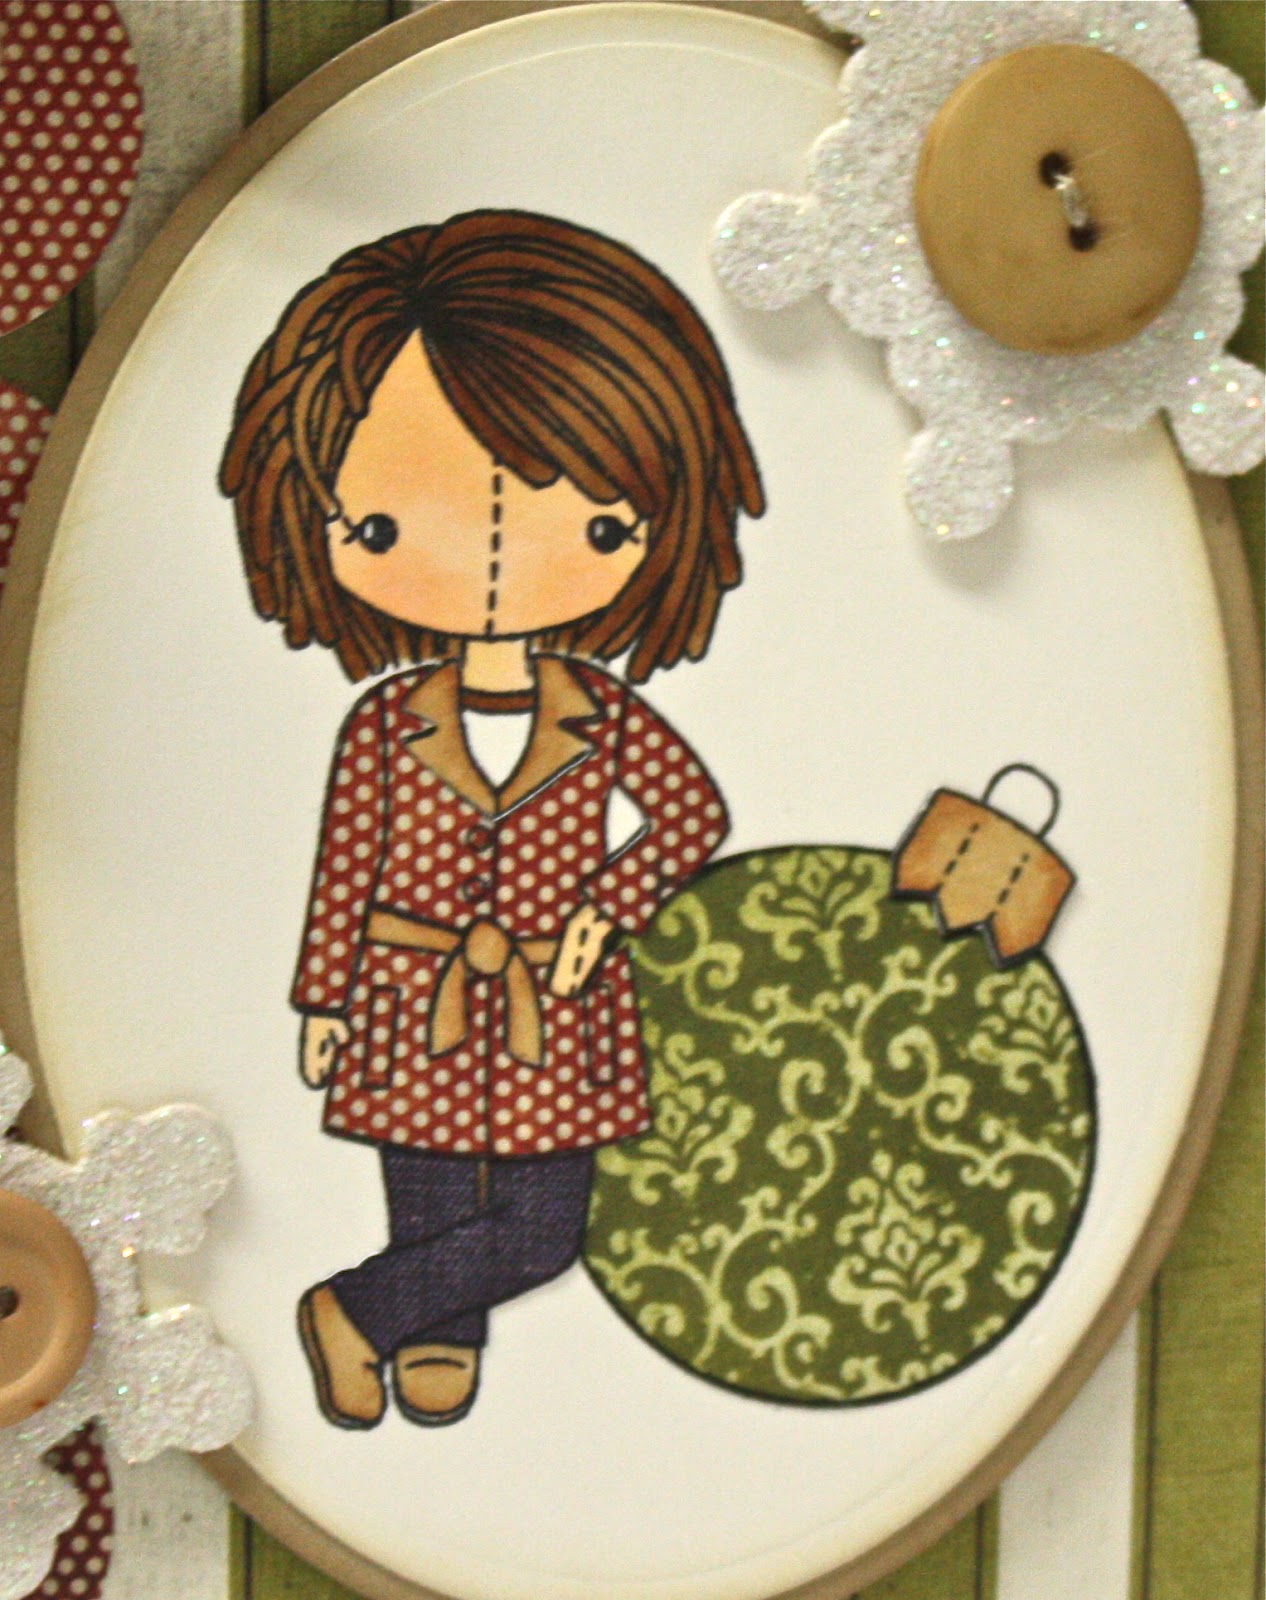
  • Stamp body/outfit from Rag Doll: Coats for Emma onto cardstock and again onto a Post-It.  Trim out image from Post-It to create a mask.
  • You are going to use the mask twice. Adhere it on top of your cardstock and then stamp the head from Rag Doll Emma: Happy.
  • Leaving your mask in place, stamp the ornament from Rag Doll: Scenes 1.
I paper-pieced Emma's outfit and the ornament using Glitz Design: Joyeux Noel paper.  How cute is her polka-dot trench coat?  I added finishing touches with Copic markers.


If you're like me then you're always looking for a little treat for teachers or neighbors.  I love to bake, but I'm better at eating the treats than I am about delivering them.  I decided on yummy hand soap instead.  This is an inexpensive and useful gift... and it was so easy to dress up using the Bottle Tag die.

The CSS Bottle Tag is unique because it has an adorable pocket that makes it perfect for tucking a gift card or small note with your treat.  I opted to trim off the pocket and decorate the base.  I love the items from Rag Doll: Scenes 1 because they combine with the leaning Rag Doll collection but are also a perfect size to stand alone on tags, etc.  I gave the ornament dimension by cutting 5 small circles, folding them in half, and adhering the folds together.  It was a quick treatment but provides a lot of 'wow'!


Visit the other gals for lots of Rag Doll sweetness:


(leave some love for my friend, and this month's guest designer!)


For more Sassy Stampin' inspiration, check out the CSS App:

{Click on the graphic above to learn more and to download the CSS Daily App.}

Wednesday, December 14

Mod Holiday - Play Date Cafe #111


It's almost Christmas but the fun continues over at the Play Date Cafe.  We're spicing things up with a Color Splash challenge - black & white plus a splash of aqua.  This is the challenge that makes me {think}!  I am allergic to bright white and typically "cheat" by using cream instead.  This week I went for it... bright white in all it's glory.  I love my "Mod Holiday" results.

A beautiful vintage Santa - holiday inspiration for PDCC111.

I used lots of Papertrey Ink goodies.  How fab is the new Quatrefoil Cover Plate?  So fab.  I stamped a flourish on the card base to add interest.  I also added text to my Half & Half die cut - a fun touch is that the wording is from 'Twas the Night Before Christmas.  Shimmer cardstock in silver was a perfect touch for the Damask Snowflake and I topped that with an element from the Photo Finishers stamp set.

Our sponsor this week is Cindy Coutts.  She's a great stamper and a great person... plus she's put together an incredible prize for is this week! {Hint: Nesties anyone?} We hope you'll play along with us this week in the Cafe... can't wait to see what you create.

ALL Supplies are Papertrey Ink unless otherwise noted.
Stamps: Fancy Flourishes, Photo Finishers, BB - Christmas (text); Cardstock: SS White, blue & silver Shimmer CS; Ink: True Black; Tools: Half & Half dies, Damask Snowflake die, Quatrefoil Cover Plate die

Wednesday, December 7

Frosty Fun - Play Date Cafe #110


We may have a snowman/woman blitz for the next few days... I just love all things snowman and I was {thrilled} when our sponsor, DRS Designs, sent me this Frosty for our Play Date Cafe challenge this week.  He was so simple to paper-piece with the Echo Park Season's Greetings collection.  Can I just tell you how much I wish we lived someplace where it snows?  But back to the fun at hand...

Our color story in the Cafe this week is bright and FUN...
Lime Green, Red, Royal Blue, and Crystal Blue


Remember, these colors are open to interpretation and neutrals are welcome additions.

Allow me to confess that the "royal blue" was a difficult spot for me, but the more I look at it, the more I like the "pop" it adds.  And be forewarned: I am going to be addicted to spray adhesive + mica flakes.  Yowza that is some kind-of cute, sparkly goodness (even if my fingers do end up sticky for days).

Be sure to pop over to DRS Designs and check out all their goodies...

click to visit website

... and play along with us this week in the Cafe for a chance to win some new stamps.  
Can't wait to see what you create!!


Stamps: DRS Designs; Cardstock: PTI Kraft & SU! Kiwi Kiss; Patterned Paper: Echo Park - Season's Greetings collection; Tools: PTI dies - Tag Sale #4, Holly Jolly, & Peace Be Still; Sassy Somethings: Melissa Frances mica flakes, PTI satin - Enchanted Evening, button

Sunday, December 4

Dear Santa


I'm working on a Daily December album during the holidays to capture my family's sweet memories of the season.  I'm just getting my large pages going, but I think it will be a lot of fun to spend time gathering photos and snippets of our day-to-day activities... especially when the kids are so young and the delight of Christmas is so innocent and pure.  Scrapbooking is a new arena for me and I'm still trying to find my comfort zone with photography and journaling.

Abigail is thrilled with all things Santa this year and has been making her list and checking it twice.  ;)  I put together a quick little mini page to tuck into our album for her.  I'm nervous to write on pages and journal with my own handwriting... so pretend it reads: tricycle, mobile (for her baby doll's crib), and new crayons.

I used Market Street Stamps Vintage Notepad background stamp  and was thrilled to find that it coordinates perfectly with the PTI Mini Book Page die.  I love the already aged background - so easy to just rub with a bit of distress ink and amp up the rustic/shabby vibe.  A few additional elements from the MSS Hippie Chic stamp set were also selectively inked for extra details.

I hope your December is off to a great start... falalalala!

Stamps: Market Street - Vintage Notepad background & Hippie Chic, MFT - Typewriter ABC; Ink: SU! Soft Suede & Old Olive, PTI Basic Black & Pure Poppy; Cardstock: PTI Rustic Cream; Tools: PTI mini book page; Sassy Somethings: Echo Park chip sticker

Wednesday, December 29

Christmas Thank You's

I hope you enjoyed the holidays and had some time to relax with loved ones. I took some time away from creating (to clean my craft/kitchen table) and to cherish this sweet season.

I was blessed with some very thoughtful gifts this year and wanted to send out a few Thank You notes. I chose a few elements and then put them to work making a set of cards to pop in the mail. I am rarely attentive to how much sassy stuff I pile on a card, but I wanted these to be easy to mail. I'm typically a 'more is more' kind-of gal but I do love the result I got from these two designs.... and I especially love the hint of Christmas from the color scheme.

Of course, I'm most thankful for my two little sweeties.
Wanted to share my joy with you:

Stamps: Musical Backgrounds - WaltzingMouse; PTI - Mat Stack 1 collection (sentiment) Ink: Stampin' Up! Soft Suede and Basic Gray; PTI Vintage Touch - Chamomile Cardstock: Stampin' Up! Crumb Cake and Riding Hood Red; PTI Rustic Cream Patterned Paper: BasicGrey's Wassail collection Tools/Dies: Fiskars - Upper Crest Punch; PTI - Mat Stack 1, Peace Be Still (dove), Double-ended Banners, Lg. Scalloped border, Heart Prints dies Ribbon: PTI - Chocolate Baker's Twine; Stampin' Up - Kraft satin (retired)

Wednesday, November 17

Just Leaf It (or not)

When my hubs walks through the door tonight and asks me "What did you do today, honey?" I am going to spare him the embellishment drama that I created for myself with this fancy card. I'll tell him that I ran the dishwasher twice and that Abigail ate the bathtub crayon, but I'll try to leave out how I took this card apart approximately 19 times and changed the embellishment. From a snowman, to holly leaves, felt snowflakes... the list is long. In the end, I still can not decide: leaves or no leaves? You choose.
Here's the scoop on challenge submissions:
  • 2 Sketches 4 You - I utilized the fantastic sketch.
  • Caardvarks - Die Cuts. The large star and accordion medallion were both made with PTI dies.
  • Wee Memories - The challenge this week is to stop hoarding your patterned paper... my October Afternoon was begging to be used. I have a thing for cute little houses... serious LOVE.
Stamps: All PTI: Wreath for All Seasons (sentiment), Peaceful Poinsettia, Fancy Flourishes; Ink: SU Riding Hood Red, Chocolate Chip and Soft Sky; Cardstock: SU Chocolate Chip and Riding Hood Red; Patterned Paper: October Afternoon Very Merry and PTI Distressed Dots; Tools: PTI Limitless Layers Circles and Seeing Stars dies, Fiskars Upper Crest punch; Sassy Somethings: SU striped grosgrain, PTI Harvest Gold button

Thursday, October 15

O' Christmas Tree PPA12

Pals Paper Arts has a Simple Sketch Challenge this week. Don't you just love a good sketch? I've got Christmas on the brain... I'm so anxious to put up the Christmas tree and deck out our little house in holiday happiness.

I tweaked the sketch a bit and made a 5.5" square card on a Chocolate Chip base. Do you just love this color combination? Chocolate Chip, Real Red, Cameo Coral, and Old Olive. Sassy!! The details on this card are what make my heart happy:
  • Flocked paper from Christmas Cocoa
  • Texture galore courtesy of Petals-a-Plenty Embossing Folder
  • Divine Patterned Pines complete with a 'sugar' coating of Dazzling Diamonds
  • Double Stitched Ribbon for a home-spun feel
One quick TIP: To glitter my trees I first inked my stamp in VersaMark ink and then inked it AGAIN in my color of choice, stamped onto Very Vanilla card stock, sprinkled with Heat and Stick Powder, warmed with my Heat Tool and finally glittered with Dazzling Diamonds.

Do you love all things PINK?? Pals Paper Arts will be hosting a VERY special challenge on October 29th with an awesome PINK Prize Package - stay tuned!

I hope you'll join in the fun at Pals Paper Arts this week!

Sassy Stampers:
SHOP ONLINE 24/7

Stamps: Patterned Pines - Hostess Level 1 (116525), Tags So Much (retired) - modified with sentiment from Season of Joy (110384)
Paper: Chocolate Chip (102128), Real Red (102762), Cameo Coral (100475), Old Olive (100702), Christmas Cocoa Specialty (116770)
Ink: VersaMark (102283), Old Olive (!02277), Cameo Coral (103035), Real Red (103133)
Tools: Scallop Circle #2 BIGZ Die (113469), Petals-a-Plenty Embossing Folder (116824), Heat Tool (100005)
Must Haves: Heat and Stick Powder (100625)
Sassy Somethings: Real Red Double Stitched Ribbon (115607) , Dazzling Diamonds Glitter (102023) Buttons - PTI

Sunday, September 13

Vintage Santa

When I saw the Just Beclause stamp set in the NEW Holiday Mini I think my heart skipped a beat. I love things with a bit of a vintage twist lately, and the text print of 'Twas the Night Before Christmas' on Santa's coat really makes my heart flutter. BONUS: At only $14.95 - this set is a steal! This whimsical St. Nick just had to be stamped... he couldn't wait!

The layout for my card is inspired by a sketch challenge at Caardvarks. My Soft Suede card base is 5" x 7" and is layered with a matte of Ruby Red as well as a few polka-dotty prints from The Write Stuff Specialty paper collection. TIP: Using two different sizes of the polka-dot print helps balance the project.

A vertical strip of Chocolate Chip Striped Grosgrain was pleated and added. TIP: When making ribbon pleats there are several ways to give them staying power: 1) Staples. Check your local craft store for staples in all kinds of fun and funky colors. 2) Sewing Machine. 3) Simple Stitch. I use Linen Thread and a sewing needle to add one simple stitch to each pleat. I'm not a seamstress, (i.e. replacing buttons is about as advanced as I get) so this is the easiest way for me.

I stamped Santa onto Kraft in Chocolate Chip ink as well as onto Ruby Red and Soft Suede to paper piece his coat, hat, and sack full o' toys. To complete his outfit I used my Ruby Red Stampin' Write Marker on the sleeves and a white Watercolor Pencil for the trim and beard. I debated coloring the toys, but decided Santa should be the focus.

Santa is layered with Ruby Red and Chocolate Chip. A darling Scallop Edge border and single Playground Button seemed like perfect accents - simple, but sassy. The entire panel is popped using Stampin' Dimensionals.

The sentiment, 'Believe in Santa... just beclause!', was popped using the Modern Label Punch. Two Vintage Brads decorate each side - creating a mod little 'banner'. The brads are echoed in the bottom corner and unify the elements.

Need a Holiday Mini Catalog?
E-mail me and I'll pop your FREE copy in the mail.

Sassy Stampers:
SHOP ONLINE 24/7

Stamps: Just Beclause (116640)
Paper: Soft Suede (115318), Ruby Red (102030), Chocolate Chip (102128), Kraft (102125), The Write Stuff Specialty Designer Series (115674)
Ink: Chocolate Chip (100908), Ruby Red Stampin' Write Marker(100075), Watercolor Pencils (101879)
Tools: Modern Label Punch (116630), Scallop Edge Punch (112091)
Must-Haves: Stampin' Dimensionals (104430)
Sassy Somethings: Chocolate Chip Striped Grosgrain - 1.25" (115617), Linen Thread (104199), Vintage Brads (109109), Playground Buttons (116313)

Tuesday, September 1

The Perfect Bow

I've gotten several requests to demonstrate my bow making technique. This is one of the ways that I like to create bows - especially for cards that need to be mailed because the result isn't too "poofy".
Apply Sticky Strip where you plan for your ribbon to be placed. Here it is the 'seam' where the 2 patterns meet. Leave a small gap without adhesive. (see where I'm pointing) Remove the backing ONLY from the long piece of sticky strip and adhere your ribbon.

For the bow, cut a strip of ribbon and apply adhesive to one end. For a medium bow I used a 7" strip of 5/8" cream grosgrain. Next, adhere the two ends together and create a circle.


Grab your thread (baker's or button twine) and a sassy button.
Thread both ends through the button holes, keeping a loop of thread.

Slide your button loop onto your ribbon strip to the place where there is no adhesive. Also slide your ribbon circle into place. Tighten the thread (the middle should 'scrunch') and tie in a tight knot against the button. Remove the backing from the remaining Sticky Strip and tack your excess ribbon down - tucking the end over the edge for a clean and neat presentation. Trim your excess thread and 'voila!' - a sassy bow!

My snowy hills were made using the 1.75" Circle Punch and trimming them to line up with the bottom edge. A few halfback pearls accent the trees and are the perfect sassy something to finish up this simple card.

This Christmas cutie also meets the 'requirements for this week's Pile It On Challenge - Think Spots and Dots. It is based on the sketch that I found at Stamps and Smiles as well as a great example for this week's Practical Scrappers challenge. FOUR challenges - WOW!

I hope you'll play along with us at Color Throwdown this week - I can't wait to see what you create!

Thursday, August 20

Christmas in August

I didn't think I was ready to get into 'Christmas mode', but this card has completely changed my mind! I'm ready to deck the halls and trim the tree! While those things may be a bit premature, I can definitely get a head start on Christmas cards. Today's card is inspired by 3 challenges:
ALL of these sites host fun and unique challenges each week - be sure to check them out for inspiration and project ideas!

The measurements for my card layers (from bottom to top):
  • Soft Suede card base 5.5" x 11" - scored in half.
  • Sneak Peek: Christmas Cocoa Specialty Designer Series Paper - 5.25" square.
  • Kiwi Kiss (retired Bella Rose Designer Series Paper) 4.75" square. TIP: Old Olive or Mellow Moss would be perfect 'subs' for this color combination.
  • A 4.25" square of Soft Suede got zipped through the Big Shot using the Finial Press Embossing Folder.
  • Whisper White textured card stock trimmed to 3.5" square. (Rounded corners compliments of my 3/16" Corner Rounder.)
More Details:
  • I used my handy Stamp-a-ma-jig to place the Ornaments. TIP: By using Grid Paper I was able to make sure they were evenly spaced. In addition, I lined up the 'string' stamp with the grid lines to be sure they were stamped straight.
  • The Soft Suede ornament was stamped twice - once on the Whisper White base layer, and again on a separate sheet to be trimmed and 'popped' using Stampin' Dimensionals.
  • My sentiment was created using stamps from Season of Joy. First, I stamped the swirl image in Kiwi Kiss. Next, using my Stamp-a-ma-jig, I added 'Merry Christmas' on top. The image was quickly punched using the Wide Oval Punch... one of my favorites!
NEW Christmas Products and a whole lot more....
September 1st - Holiday Mini!
Need a Holiday Mini catalog sent to you?
E-mail me your address and I'll pop it in the mail!

Stamps: Tree Trimmings (116722), Season of Joy (110384)
Paper: Soft Suede (115318), Whisper White - 12 x 12 Textured Neutrals - astd. (108693), Christmas Cocoa Specialty Designer Series (available September 1st) Bella Rose Designer Series (retired)
Ink: Soft Suede (115657), Kiwi Kiss (retired)
Tools: Big Shot Machine (113439), Finial Press Embossing Folder (115963), 3/16" Corner Rounder (109047), Wide Oval Punch (112082), Scallop Oval Punch - Marvy (pink)
Must-Haves: Stamp-a-ma-jig (101049), Grid Paper (102787), Stampin' Dimensionals (104430)
Sassy Somethings: Soft Suede Polka-dot Ribbon (115612), K&Co. Snowflake Brads