Tuesday, March 31

Addicted to Chocolate

What's your guilty pleasure? Other than stamps, designer paper, sassy embellishments, and ribbon... mine is CHOCOLATE. ;) Turns out that I like all kinds of chocolate, not just the melt in your mouth kind. Today's project showcases Chocolate Chip... a beautiful, rich neutral that goes with everything and seems to turn up in lots of my projects.

Speaking of Chocolate... and candy.... be here tomorrow for a little BLOG CANDY in celebration of the NEW Occasions Mini!

My Chocolate Chip card base is 5" x 7" and is topped with Green Galore (4.75" x 6.75") and a tiny polka dot print from Bella Rose Designer Series Paper. (4.5" x 6.5") I grabbed my 1" Chocolate Chip Double-Stitched Grosgrain Ribbon and ran three strips across my card. TIP: The ends are folded and adhered behind the green matte to provide a neat edge. To draw the eye towards the middle and provide a little emphasis, I added some turquoise ribbon from my stash to either side of the center ribbon. (Making Memories Boho-Chic)

I used the Eastern Blooms set and inked up the largest flower in Taken With Teal. TIP: I stamped onto Whisper White textured card stock. I like the way the textured paper works with solid image stamps. These teal blooms were topped with a smaller Chocolate Chip flower... notice the Vintage Brad middles. For my 'centerpiece' I stamped the branch image in Chocolate and selectively punched it using my Marvy scalloped square punch. (pink) Next, I decided to color directly onto the branch stamp with my Taken with Teal and Green Galore markers. I punched a few blooms using my 1/2" Circle Punch and mounted them in Build-A-Brads. Everything was 'framed' with scalloped squares (Marvy pink and purple).

To tie everything together (literally!) I added a big brown bow. TIP: Using my Crop-O-Dile I punched 2 holes at the top of my card (approximately 1/3" apart) and then pulled my ribbon through (like a shoelace) to tie a bow. When I adhered my card front to the base I used Sticky Strip for extra hold and to help make sure everything stayed put.

Love this sassy creation? Today's colors were inspired by:
Dawn McVey's Raspberry Suite Color Challenge.
Talk about a sassy gal!

CLICK HERE to order Stampin' Up! online anytime!

Stamps: Eastern Blooms (111626)
Paper: Chocolate Chip (102128), Green Galore (101768), Taken with Teal (101584), Whisper White - Textured Neutral 12x12 asst. (108693), Bella Rose Designer Series Paper (112041)
Ink: Taken with Teal (103257), Chocolate Chip (100908);
Markers: Green Galore (100048), Taken with Teal (100068)
Tools: Crop-O-Dile (108362), 1/2" Circle Punch (104390)
Must Haves: Sticky Strip (104294), Stampin' Dimensionals (104430)
Sassy Somethings: 1" Chocolate Chip Double Stitched Ribbon (111849), Build-A-Brads - Antique Brass (109108), Vintage Brads (109109), Marvy punches, Making Memories Ribbon

Saturday, March 28

Color Personality

What color best describes your personality? Are you bold? Fun loving? Adventurous? If you're nodding your head then you are going to love today's bright color combination courtesy of Kristina Werner: Tangerine Tango, Chocolate Chip, So Saffron, and Whisper White.

My textured Tangerine Tango card base is 7" x 4.25" with a scalloped edge. I layered Chocolate Chip card stock and Patterns Designer Series Paper with So Saffron to create a background. Then, I inked up some funky flowers from the Botanical Blooms set, a Sale-A-Bration exclusive. Hurry! There are only 2 days left of Sale-A-Bration - get your freebies while you still can!

I have a secret: I don't have a Tangerine Tango ink pad. How did I get those ohh so orange blooms? With my Only Orange marker. I colored directly onto the stamp -- huffed to ensure maximum moisture -- and voila! TIP: Pumpkin Pie is a close match as well. Botanical Blooms is a 2-Step set, so my trusty Stamp-A-Ma-Jig helped me get my Chocolate Chip outline perfectly aligned. I used my 1" circle punch for the image and my 1.25" circle punch to create a So Saffron matte. Finally, my Scalloped Circle Punch finished things up.

I ran Double Stitched Chocolate Chip Ribbon along the bottom of my card and topped it with a layer of So Saffron grosgrain. The sentiment, 'to thine own self be kind', is framed by Hodgepodge Hardware. I felt it needed more sass so I added a few extra brads and some swirly clips for good measure. TIP: A Crop-o-Dile will easily punch through multiple layers. (Without giving you a hand cramp - I promise!)

Take advantage of these last days to Sale-A-Brate. CLICK HERE to order online and claim your freebies.

And remember, there will be goodies on Wednesday for the debut of the Occasions Mini. Meet me here. Until then, don't just stamp... stamp with sass! ;)

Stamps: Botanical Blooms - SAB '09 - (113812)
Paper: Chocolate Chip Patterns Designer Series Paper (112164), Chocolate Chip (102128), So Saffron (105118), Tangerine Tango Textured -- In Color 12 x 12 astd. (111345)
Ink: Chocolate Chip (100908), Only Orange Marker (100051)
Tools: 1" Circle Punch (109046), 1.25" Circle Punch (104403), Scalloped Circle Punch (109043), Scalloped Edge Punch (112091), Crop-A-Dile (108362)
Sassy Somethings: Chocolate Chip Double Stitched Ribbon (111849), So Saffron Grosgrain - SAB '09 - (114618), Hodgepodge Hardware - currently available in Styled Silver (111325) and Very Vanilla (112454)

Totally Textured

I have to touch things... to feel the texture of clothing and fabrics and even paper. It's special when something not only looks nice but feels nice too. With that in mind, I decided to incorporate texture into today's card -- a small, cute, quickie -- perfect for popping a sweet note in the mail.

My card base is 3.5" x 5" -- a small note card made from Kraft card stock. I love the way Kraft looks organic and earthy. To begin, I matted a strip of textured Baja Breeze onto Chocolate Chip. Textured card stock is a wonderful addition to your projects. In fact, I think it should officially be added to your wish list... or your shopping cart. ;)

Speaking of wish lists, get yours ready for the Occasions Mini. I'm so excited to share it with you next week. (SUBSCRIBE on my right sidebar to be sure you don't miss out on the FUN!) One of my fave new products are the Summer Love Rub-ons. I added a few to the main panel, as well as along the bottom border. Some 1" Double Stitched ribbon in Chocolate perfectly merges the gap between the two elements. For our Sassy Something today I wanted to use my Canvas Cuts. Have you seen these on page 177 in the Idea Book and Catalog? They are canvas, die cut shapes made to be used with the Fashion District Rub-ons. Stampin' Up! is so great about coordinating products!

My background for my canvas bloom is a Gallery frame stamped in Cameo Coral onto Very Vanilla textured card stock. A Baja Breeze corduroy brad provides the perfect middle - with perfect texture. Last, but never least, two Vintage Brads find a home in Ticket punched corners.

Want to add texture to your cards too? CLICK HERE to order Stampin' Up! 24/7.

Stamps: Gallery (113776)
Rub-Ons: Fashion District (113884), Summer Love (Available April 1st)
Paper: Kraft (107070), Chocolate Chip (102128), Baja Breeze Textured - 12 x 12 astd. In Color (111345), Very Vanilla Textured - 12 x 12 astd. Neutrals (108693)
Ink: Cameo Coral (103035)
Tools: Ticket Corner Punch (107214)
Sassy Somethings: Canvas Cuts (113979), Chocolate Chip 1" Double Stitched Ribbon (111849), Baja Breeze Corduroy Buttons (available April 1st), Vintage Brads (109109)

Thursday, March 26

Everyday Elegance

Spring and summer are wedding season... what better to go with your gift then a handmade card to express your congratulations and best wishes. Today's card is suited for a special occasion and takes our everyday sassy cards to an elegant level.

Once again, it all starts with a sketch. Card Positioning Systems (CPS108) was my inspiration. I instantly thought of ribbon when I saw the intersecting lines. What do you think of? I love that sketches are easy to personalize -- no one's creations are ever the same.

My Bordering Blue card base is 5.5" square. I topped that with some Kiwi Kiss textured card stock and a selection of Designer Series Paper from the Bella Birds collection. My main center panel is a piece of textured Vanilla card stock that I zipped through my Cuttlebug with the Venetian Lace embossing folder. For a focal point I chose the rose from 5th Avenue Floral and stamped it three times onto Bella Birds DSP. I trimmed and layered to create dimension. (CLICK HERE for more details on how to layer this flower.) Kiwi Kiss satin ribbon and some K&Co. fabric brads were added for luxe texture and sheen. In my opinion, the 'star' of today's project is the Stampin' Up! Corner Rounder. Something about taking off the sharp, pointy edges and producing a nice round corner instantly seemed to glam things up. My elegant sentiment, 'Best Wishes', is a sneak peek at the Oval All set that will be available next Wednesday, April 1st. Be sure to be here on Wednesday for some fun Occasions Mini treats and to check out all the awesome new stamp sets and accessories!

Since this card is to celebrate a special occasion (my cousin's wedding) I wanted to put together a matching envelope to tie everything together. My vellum envelope was purchased from a local craft store. I added a 'label' to the outside for elegant addressing and the 'Best Wishes' sentiment to the flap. NOTE: This size envelope requires extra postage.

There are only a few days left of Sale-A-Bration, and that means only a few days left to get the Starter Kit for 15%, FREE SHIPPING, and an extra stamp set of your choice. Want to join but currently on a budget? Through the end of the month Stampin' Up! is offering a 3 Payment Plan. For all the details about becoming a Stampin' Up! demonstrator CLICK HERE. Remember, I'm here to help you and to answer any questions!

To order Stampin' Up! online any time CLICK HERE.

Stamps: Fifth Avenue Floral (113734), Oval All (available April 1st)
Paper: Kiwi Kiss - Textured 12x12 In Color astd. (111345), Bordering Blue (102630), Textured Neutrals astd. (108693), Bella Birds Designer Series Paper(113981)
Ink: Chocolate Chip (100908)
Tools: Corner Rounder (109047)
Sassy Somethings: Satin Kiwi Kiss Ribbon (111879), K&Co. Fabric Brads

Wednesday, March 25

Bunny Bonanza

Today is a Bunny Bonanza! I've created three coordinating projects with the sweet little bunny from the NEW Eight Great Greetings stamp set. This set is featured in the Occasions Mini that will be released April 1st, but is one of a few sets available to you NOW for all your Easter crafts.

All of today's goodies were inspired by an SCS color challenge (CC211): Pretty in Pink, Kiwi Kiss, and Baja Breeze. I started by stamping my bunny onto watercolor paper 5 times - 3 times with the sentiment, twice without. I omitted the sentiment by carefully inking on the side of my StazOn ink pad. I colored my bunnies by 'smooshing' (a technical term) my ink pads to create small puddles on the inner lid. I then grabbed my blender pens and shaded away. I love this technique for 'watercoloring'. You get perfectly blended and shaded results with little to no effort on your own part -- the blender pen just automatically creates a lighter color as you blend outward. All of my rabbit friends were punched using the Wide Oval Punch and mounted onto scalloped ovals. (Marvy)

The centerpiece of this trio is of course, the card. I based it on SCS Sketch Challenge 221. For panel 3 I used a Baja print from Walk in the Park. You're going to love this paper! April 1st is right around the corner... be sure to subscribe (right sidebar) to be sure you don't miss any of the exciting things I have planned for next week. HINT: Candy and a Contest. Need I say more?

I wanted to create a tag for my daughter's Easter basket. My chipboard tag (Bazzill Basics) was covered in a Pretty in Pink polka dotted print. I added a background of Kiwi Kiss paper from the soon to be released Walk in the Park Designer Series Paper collection. Some Baja scallops, Pretty in Pink brads, and Baja striped grosgrain ribbon are just the right 'sassy somethings' to dress this little tag up. The 'wow!' comes from a few sweet buttons.


And what Easter basket would be complete without a few sweet treats? I zipped my Bag with Scallops die through my Big Shot with a piece of textured Baja Breeze cardstock. I trimmed the edges of my Kiwi paper with some Pretty in Pink 1/4" grosgrain ribbon, adhered Madame Bunny with some Stampin' Dimensionals, and 'voila!' -- a sweet treat bag any-bunny would be proud of! ;)


Want your own 'Happy Easter' Bunny in time for the holidays?
CLICK HERE
to order online anytime!

Stamps: 8 Great Greetings (113822) AVAILABLE NOW
Paper: Baja Breeze (111352) and Textured 12x12 astd. for treat bag (111345), Kiwi Kiss (111353), Pretty in Pink (100459), Walk in the Park Designer Series Paper (available April 1st)
Ink: StazOn, Creamy Caramel (103220), Pretty in Pink (101301), Baja Breeze (111833), Kiwi Kiss (111835), Rose Red (101778)
Tools: Ticket Corner Punch (107214), Wide Oval Punch (112082), Scallop Edge Punch (112091)
Must Haves: Stampin' Dimensionals (104430), Mini Glue Dots (103683), Blender Pens (102845), Watercolor Paper (105019)
Die Cutting: Big Shot Machine (113439), Extended Cutting Pads (113478), Bag w/ Scallops Bigz XL Die (114519)
Sassy Somethings: Soft Subtles Brads (106954), Baja Breeze 5/8" Striped Grosgrain (111375), Pretty in Pink 1/4" Grosgrain (109032), Button Bouquet (112092)

Raspberry Cupcakes

What is your favorite cupcake flavor? After today it just may be raspberry! Combining Crazy for Cupcakes with Raspberry Tart Designer Series Paper makes for a yummy treat indeed!

I based my long note on a Card Positioning Systems sketch.
This simple sketch made it easy to whip something right up!

My Rose Red card base (4" x 9.25") was layered with Cameo Coral and a few delicious prints from the Raspberry Tart Designer Series Paper collection. A piece of satin Kiwi Kiss ribbon cleverly hides the seam where the two papers meet. The cupcake panel was created by layering Rose Red and another kiwi print from Raspberry Tart. I ticket punched the corners for some extra interest. My plate full o' cupcakes was inked up in Chocolate Chip and stamped onto Whisper White. I colored everything with my Stampin' Up! markers and voila - scrumptious treats! The cherries on top of these little yummies are accented with red micro beads. If you've previously overlooked Stampin' Up's delightful bead duos, you might want to take a second look. These sassy somethings are great for adding a little extra shimmer and shine to your creations. Plus, with six different shades to choose from you'll surely be in bead heaven!

My panels were adhered using Stampin' Dimensionals. I selected some Hodgepodge Hardware to accent my sweet sentiment. The 'icing' on this cupcake card are the Kiwi Kiss buttons from Button Bouquet.

Want to make your own sweet creations? You've got the 'recipe', now all you need are the supplies. Click here to order Stampin' Up! online anytime!

Stamps: Crazy for Cupcakes (111618)
Paper: Raspberry Tart Designer Series Paper (113975), Rose Red (102544), Cameo Coral (100475), Whisper White (100730)
Ink: Chocolate Chip (100908); Markers: Pretty in Pink (100045), Close to Cocoa (100072)
Tools: Ticket Punch (107214)
Sassy Somethings: Kiwi Kiss buttons - Button Bouquet (112092), Red Bead Duo (110731), Satin Kiwi Kiss Ribbon - reverses to Very Vanilla (111879), Hodgepodge Hardware - currently available in Styled Silver (111325) and Very Vanilla (112454)
Monday, March 23

Hey Chickie

Ever been in a stampin' rut? Got 'stamper's block'? Great news! Stampin' Up! has an incredible variety of products that you can use to whip up adorable cards and projects - no stamps required. For today's chickie card I used On Board So Tweet and some sweet Tea Party Designer Series Paper.

Stampin' Up! chipboard is a snap to cover:
  1. Cut a piece of designer series paper slightly larger than the image you are going to cover.
  2. Adhere paper to chipboard using adhesive - be sure the design you want to show is facing outward.
  3. Trim closely around your shape.
  4. Rub sides with a sanding block to keep 'funky edges' away! Confession: I didn't have any sanding blocks today, so in a 'pinch' I used a nail file -- it worked perfectly! ;)
The layout for my card is from Our Creative Corner.
My card measurements are:
Almost Amethyst Base: 5" x 7"
Background: 4.75" x 6.75"
Striped Panel: 3.75" x 5"
Floral Panel: 2.5" x 4.75"

So Saffron Ribbon from the Sale-A-Bration Ribbon bundle is layered with Pretty in Pink 1/4" grosgrain. Instead of a bow, (because you and I both know that sometimes bows are hard to get just right) I opted for a K&Co. paper flower for embellishment.
I stuck my Easter chickie to my card front using Glue Dots -- pop-up for the main body and mini for her other parts. Lastly, a quick rub-on sentiment was added to a tab courtesy of my Round Tab Punch. Two So Saffron brads perfectly pull everything together.

Want to add some sassy new supplies to your stampin' space? CLICK HERE to order Stampin' Up! online any time day or night!

On Board So Tweet (113893)
Paper: Almost Amethyst(102158), So Saffron (105118), Pretty in Pink(100459), Tea Party Designer Series Paper (113992)
Must Haves: Pop-Up Glue Dots (104183) and Mini Glue Dots (103683)
Tools: Round Tab Punch (108340)
Sassy Somethings: So Saffron Ribbon - Sale-A-Bration Ribbon Bundle (114618) , Pretty in Pink 1/4" Grosgrain (109032), Rich Regals Brads (106953)

Sunday, March 22

All Aboard!

Take a ride on the rails with your favorite animal pals. Today I'm giving you a sneak peek from the Spring Occasions Mini. The new Choo Choo set and coordinating wheel are bound to keep your kid cards Right on Track. And for added fun, I used a few of the Wild About You animals as 'passengers'.

My Pumpkin Pie long note card base measures 4" x 9.25". I followed that with two layers: Bashful Blue and a selection from Delicate Dots Designer Series Paper, a Sale-A-Bration freebie. Don't forget: Sale-A-Bration ends March 31st. Click here to place an order and qualify for your own Sale-A-Bration freebies*.

I started my scene by running my Right on Track wheel onto So Saffron card stock and trimming a piece to fit my card front. I stamped my train cars on Whisper White in Chocolate Chip, Bashful Blue, and Pumpkin Pie. Then, I whipped out the birdie from Wild About You and my trusty Stamp-A-Ma-Jig to perch my fine feathered friends on my locomotive. While I was busy inking I also stamped the giraffe and my little lion in Chocolate Chip onto So Saffron.

Time to trim! I used an Xacto knife to cut a small slit in one of the windows so that my giraffe's long neck could peek out. For my lion, I trimmed around his mane and adhered his head with Stampin Dimensionals to a train car so it would seem like he was hanging his head out the window. Everything was placed onto the track using Stampin' Dimensionals. TIP: I frequently cut my dimensionals in half to better hide them.


I ran a strip of So Saffron grosgrain ribbon (another Sale-A-Bration freebie) across the top of my card and accented it with two Chocolate Chip buttons. My sentiment, "Wild About You!", was inked in Pumpkin Pie, stamped onto So Saffron, and punched out with the Wide Oval Punch. To add emphasis I layered it onto a scalloped oval in Bashful Blue. The finished product is sure to bring a smile to a child's face! If you're looking for more kid friendly card ideas check out the "Tot Spot".

Do you wish you already had this incredible Choo Choo stamp set and Right on Track wheel? The only way to get new stamps and accessories before everyone else is to sign up as a Stampin' Up demonstrator. The benefits are great whether you want to support your stampin' hobby with a discount or make extra money by selling. Click here to find out about all the perks and for more details.

*Each increment of $50 from your purchase is eligible for a Sale-A-Bration freebie.

Stamps: Wild About You (115110), Choo Choo and Right on Track Wheel (available April 1st)
Paper: Pumpkin Pie (105117), Bashful Blue (105120), Delicate Dots Designer Series Paper - Sale-A-Bration(114674)
Ink: Pumpkin Pie (105216), Bashful Blue (105209), Chocolate Chip (100908)
Must Haves: Stampin' Dimensionals (104430), Mini Glue Dots (103683)
Tools: Wide Oval Punch (112082), Marvy scalloped oval punch (pink)
Sassy Somethings: Chocolate Chip Buttons - Button Latte (114333), So Saffron Ribbon (Sale-A-Bration Ribbon Bundle 114618)

Friday, March 20

Trendy Trees

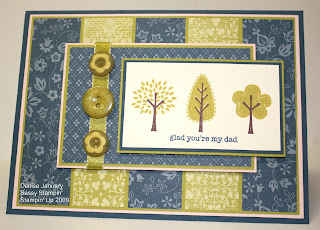
Are you a trendy girl... always looking for that special, unique thing with just the right amount of pizazz? Well, Trendy Trees are for you! These chic little trees make quite a statement on today's card.
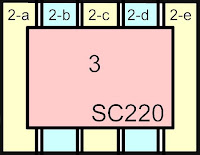
I've combined two challenges: Splitcoast Stampers Sketch Challenge (SC220) with this week's Color Throwdown #34: Not Quite Navy, Kiwi Kiss, and Blush Blossom. I think sketches are a great way to get started, but don't feel like you have to stick to ALL the rules. (There are no challenge police!) I added a panel so my card measurements are:

Card Base: 6.75" X 5"
Background Strips: 1.3" wide
Main Panel: 4.5" x 3"
Tree Panel: 3.75" x 2.25"

I like to layer and had the extra time for it, but you could easily omit my extra matting to speed things up a bit.

My Sassy Somethings today are satin Kiwi Kiss Ribbon and some adorable buttons from Button Bouquet. TIP: I love that messy glue is a thing of the past! Mini Glue Dots are a fabulous and EASY way to adhere embellishments... no muss, no fuss!

The Trendy Tree set featured today is a steal -- only $17.95! Grab one today and don't forget that Sale-A-Bration is ending soon! Click here to place your on-line order with me and earn FREEBIES for every $50 you spend!

Stamps: Trendy Trees (113258), Just So Sayings (retired)
Paper: Not Quite Navy Patterns DSP and CS (101722), Bella Rose DSP (112041), Kiwi Kiss (111353), Blush Blossom (103318), Textured Vanilla - Neutrals asstd. (108693)
Ink: Chocolate Chip (100908), Kiwi Kiss (111835), Not Quite Navy (103008)
Must Haves: Mini Glue Dots (103683)
Sassy Somethings: Satin Kiwi Kiss Ribbon - reversible to Very Vanilla (111879), Button Bouquet (112092)

Tuesday, March 17

Rise & Shine -- Ribbon & Roosters

I woke up this morning knowing one thing for certain: there would be no flowers in today's project. I turned to my Level 2 Hostess Set, Rustic Rooster, and to Splitcoast Stampers for inspiration. I decided to combine the Technique Lovers Challenge (TLC212) to create a Ribbon Frame with Color Challenge (CC210): Riding Hood Red, Summer Sun, and Kraft.

Upon review of my ribbon piles I opted to replace Summer Sun with So Saffron. To read the instructions for making a ribbon frame click here. I changed things up a bit by making the top of my frame into a bow. I tied my So Saffron grosgrain ribbon (a Sale-A-Bration freebie) to a textured 4" x 4" Riding Hood Red base. TIP: I recommend using glue dots to adhere your ribbon knots to its base and to prevent movement. My lower corners still looked like they needed a little something to me so I whipped up some cute embellishments using my Build-A-Brads and the smallest stamp from the rooster set.

My rooster is stamped in Chocolate Chip on a 2" square of Kraft. I also added one of my brads to the curve of the roosters tail - an idea I got from the Spring/Summer Idea Book & Catalog. A quick background was created by repeatedly stamping the french script onto Kraft. To pull everything together I used my Round Tab punch and some Vintage Brads to add the 'for you' sentiment off to the side. (part of the Great Friend set available April 1st)

Stamps: Rustic Rooster - Hostess Level 2 (113274), Great Friend (Occasions Mini available April 1st)
Paper: Riding Hood Red textured card stock (asstd. 111345), So Saffron (105118), Chocolate Chip (102128), Kraft (107070)
Ink: Chocolate Chip (100908)
Tools: Round Tab Punch
Sassy Somethings: Build-A-Brads - Brass (109108), Vintage Brads (109109), So Saffron Grosgrain Ribbon from the Sale-A-Bration Ribbon Bundle (114618)

Monday, March 16

Soft Summer Long Note

I'm highlighting another beautiful set from the Occasions Mini today: Soft Summer. Did you know that you can purchase a selection of sets from the NEW Mini right now? Click here to see which sets are currently available for purchase. The remainder of the sets and goodies will 'go live' on April 1st.
My 'long note' begins with a Not Quite Navy card base measuring 4" x 9.25". Soft Summer is a 2-Step Stampin' set that is double mounted. I really like the organic feel these blossoms have. In addition, the tone and texture that is created with these stamps remind me of water coloring... but without all the mess! I stamped the 'base' of the floral image three times onto Very Vanilla card stock in Kiwi Kiss. I came back with Old Olive for the outline image. I snipped everything out and layered it across a strip of Walk in the Park Designer Series Paper printed in So Saffron. I'm crazy about the prints and designs found in this paper pack!

I wanted a few of my blooms to stand out so I decided to re-stamp my floral image in Baja Breeze, outlined in Not Quite Navy. After some more snipping I used Stampin' Dimensionals to randomly place these blue buds. Since flowers and butterflies just naturally go together I quickly grabbed my winged pal from Great Friend and stamped her in So Saffron. TIP: I love that you can gently fold the wings to really make her pop off the page. Some sweet scallops add a bit of detail and interest. Finally, a sentiment from Soft Summer, "Kind People are the best kind of people.", was double matted in Baja and Kiwi. I can see myself turning to this sentiment again and again. After all, a great sentiment is the heart of any card.

Stamps: Soft Summer and Great Friend (both available April 1st as part of the Occasions Mini)
Paper: Baja Breeze (111352), So Saffron (105118), Not Quite Navy (101722), Kiwi Kiss (111353), and Walk in the Park DSP (also available April 1st)
Ink: Kiwi Kiss (111835), Old Olive (102277), Baja Breeze (111833), Not Quite Navy (103008), So Saffron (105213)
Sassy Somethings: Scallop Edge Punch (112091), pearl stickers not SU

Sunday, March 15

Great Friend Flying By

With Easter right around the corner I've been in the mood to use my Soft Subtles card stock. I decided to combine these pastel shades with a stamp set slated to debut April 1st: Great Friend. The Occasions Mini is full of must-have sets, but for me, Great Friend was at the top of my wish list. I started today with a sketch from Card Positioning Systems (CPS). I love using sketches to help organize my thoughts and allow me to 'hit the ground running'. Click here to see the sketch.

My Certainly Celery card base is 5.5" square. I used the stem and leaf silhouette and created my own 'designer' paper by stamping with Mellow Moss onto matching card stock. If you're confident enough you can stamp freehand, but I prefer to use my Stamp-a-ma-Jig. Too many failed attempts at willy-nilly stamping have taught me just use my trusty tool from the start. A strip of Perfect Plum was zipped through my CuttleBug and embossed with the Swiss Dots folder. TIP: I love to use ribbon to hide seams where different papers meet.

Next, the butterfly image was stamped onto Pretty in Pink, Barely Banana, Bashful Blue, and Pale Plum. I used matching ink colors, but to create more definition my main butterfly was stamped in Perfect Plum onto Pale Plum cardstock. I thought she would stand out even more when accented by a Gallery frame in Pale Plum. The small blooms were given brad middles. It's so fun (and easy) that Stampin' Up! knows coordination is key and offers a multitude of products in their exclusive color schemes. Happy spring stamping!

Stamps: Great Friend (available April 1st), Gallery (113776)
Paper: Pretty in Pink, Pale Plum, Certainly Celery, Mellow Moss, Barely Banana, Bashful Blue, Perfect Plum -- All Soft Subtles -- 8.5' x 11" asstd. (105568)
Ink: Pretty in Pink (101301), Bashful Blue (105209), Mellow Moss (102774), Pale Plum (102732), Perfect Plum (101437), Barely Banana (101170)
Sassy Somethings: Soft Subtles Brads (106954), Whisper White 1/4" Grosgrain Ribbon (109025), Pearl Stickers not SU

Friday, March 13

Wild About Babies

It seems that all my friends are currently new parents or expecting a bundle of love. Therefore, you can expect to see a variety of baby and kid friendly creations over the next few months. A couple of Sale-A-Bration FREEBIE items are being featured today: Certainly Celery poly-twill ribbon from the exclusive Ribbon Bundle and Delicate Dots Designer Series Paper. TIP: Ribbon doesn't always have to equal bows. It's a great element for adding texture, and texture always equals interest. The prints and designs from Delicate Dots will suit a variety of spring projects, but they seem particularly suited for all my baby boy crafts. The colors: Bashful Blue, Certainly Celery, So Saffron, and Sahara Sand.

A darling set for kids is Wild About You. These animal stamps have endless possibilities. I started by stamping the giraffe in Chocolate Chip onto So Saffron card stock. I also inked up the lion in Chocolate and stamped him onto white. I cleaned my stamp and re-inked him in Bashful blue. Following some clever trimming, I was able to layer my little lion -- creating interest and depth with Dottos. He was framed up using Marvy scalloped square punches. I stamped the bird 3 times on different colors of card stock. I used my new favorite sassy somethings, Build-A-Brads, to give these sweet birdies some extra 'oomph'. These do-it-yourself brads are an awesome way to coordinate your projects. And best of all, they're easy! Simply punch your image using the 1/2" circle, adhere it to the brad, and finally, pop the clear 'bubble' on top. Voila!

To personalize this card I used my Jumbo Outline Alphabet. TIP: These letters are also great for scrapbooking or creating cute monograms. My ever-ready Stamp-A-Ma-Jig helped me place one last bird inside the 'o'. These little details and extra touches are what I think make all the difference between just an 'okay' card versus a 'wow!' card.

Stamps: Wild About You (115110), Jumbo Outline Alphabet (114998)
Paper: Delicate Dots DSP - SAB (114674), So Saffron (105118), Bashful Blue (105120), Certainly Celery (105125), Chocolate Chip (102128)
Ink: Chocolate Chip (100908), Bashful Blue (105209)
Sassy Somethings: Build-A-Brads (109108), Certainly Celery Poly-twill Ribbon - SAB ribbon bundle (114618)

Thursday, March 12

Brilliant in Black and White

Black and White -- it's not just for zebras anymore. This card was previously entered for KWerner Design Challenge #45, and it is a perfect fit for today's Splitcoast Limited Supply Challenge. (LSC213)

Honestly, I panicked a little. After several failed attempts to use stamps I remembered my delightful stash of Stampin' Up! rub-ons. I thought the fun blooms from Hidden Garden were a perfect pairing with the NEW Walk in the Park Designer Series paper. (available for purchase April 1st) You are going to be head over heels in love with this new paper printed in retro-dreamy shades of Cameo Coral, Baja Breeze, Kiwi Kiss, and of course, Basic Gray. And guess what!! There will also be coordinating Summer Love rub-ons. All the more reason to get some practice rubbing now! ;)

The large peony bloom on my card was rubbed onto textured Basic Gray card stock and punched using a Marvy extra-giga circle. My smaller bloom was also rubbed onto Basic Gray and punched using my 1" circle punch. A Basic Black matte was created using my 1.25" circle punch. TIP: Stampin' Up! punches are a great way to save time and get perfectly layered results. The sentiment, 'friends' was combined with a tiny flower rub-on. All my blooms got shiny silver brad middles. Some black and white polka dotted ribbon and gray buttons from my stock pile are the perfect finishing details. I love that I decided to extend the ribbon off the edge of the card -- something unexpected and sassy.

Be sure to continue checking back here for more Occasions Mini previews. In fact, go ahead and SUBSCRIBE (right sidebar) to be sure you don't miss a thing! HINT: Next week there will be CANDY and a CONTEST. Need I say more?

Supplies:
Hidden Garden Rub-Ons (111414)
Vintage Brads (109109)
Textured Neutrals card stock asstd. (108589), Walk in the Park DSP (available April 1st)
1" Circle Punch (109046), 1.25" Circle Punch (104403)

Tuesday, March 10

Spunky Florals

Inspiration for card making is everywhere. My upline, Mary (of Stampin' Pretty fame), loves to draw inspiration from catalogs and advertisements. (Click here for more about joining our group.) Today, I encourage you to find something NEW to inspire you -- an article of clothing, a magazine ad, or even an element in nature. My inspiration for today's card comes courtesy of Spunky Sprouts and Splitcoast challenge IC170.
If only my daughter were a little bit bigger I would have ordered this dress on the spot... anyone else an impulse shopper? ;) But I digress, onward to card making...

The bright blooms of the dress reminded me of 5th Avenue Floral, a set that is quickly becoming a favorite of mine. I stamped the largest flower twice in Basic Black on Real Red card stock and another time onto one of the more subtle patterns from Real Red Patterns Designer Series Paper. I then trimmed 2 different flower layers from my card stock and adhered them with Stampin' Dimensionals to the patterned paper. It really gives the bloom some 'ooo-la-la', don't you think? TIP: I stamped the bloom off first onto scratch paper and shaded 3 areas with different colored markers to help me visualize where I felt the layers should be. No 'blind' cutting here, folks!
My Real Red card base (5" x 7") is followed with a layer of Basic Black textured card stock (4.75" x 6.75"). Three Tempting Turquoise rectangles (2" x 4.5") got a layer of Real Red polka dots. To help showcase my red flower I popped it on a turquoise circle which in turn was double matted on Yo Yo Yellow and Brilliant Blue. Some black brads in my corners and two darling yellow daises help create a focal point.
The sentiment from 5th Avenue Floral is also double matted. (What can I say, I love layers!) Some black ribbon from my stash literally ties everything together.

Stamps: 5th Avenue Floral (113734)
Paper: Bold Brights 8.5 x11 asstd. (105548)
Ink: Basic Black (101179)
Sassy Somethings: Vintage Brads (109109)

Monday, March 9

Make it Pop!

There are so many ways to make your creations pop... everything from color choices to sassy embellishments can give your cards that extra 'something' that makes it stand out. Today, I decided to literally make my card POP by adding a pop-up panel to the inside. You can find instructions for making your own pop-up card here.


I incorporated Splitcoast Color Challenge CC208: Kiwi Kiss, Pink Passion, and Chocolate Chip. A little secret: I am terrified of Bold Brights and the Pink Passion was a doozy for me to wrap my crafty brain around. I decided to use it as an accent color so that it would not be too overwhelming.

My Bella Rose Deigner Series Paper is a favorite - rarely leaving my immediate craft zone. I combined it with a strip of Chocolate Chip Patterns paper that I used my Scallop Edge Punch on and voila -- instant pizazz. Some 1" stitched Chocolate Chip ribbon provides a nice boundary between the two. I used Doodle This and it's (retired) mate Doodle That. For my large floral square I first stamped the bloom directly onto Kiwi Kiss. I stamped it an additional time onto Pink Passion, snipped it out, and adhered it on TOP of the Kiwi matte with Stampin' Dimensionals. (This way I was sure not to lose any of the details to trimming.) Three rhinestone brads give my card front some pop -- and some added sass.


When making a pop-up card, so much emphasis is on the inside of the card that you may want to go the 'extra mile' and really decorate it as well. I added some delightful blooms (perfectly aligned with my Stamp-a-ma-Jig) and some more Bella Rose DP to tie everything together. My sentiment is from Happy Everything - a great little set that can be used again and again.

Stamps: Doodle This (114954), Doodle That, Happy Everything (115235)
Paper: Bella Rose DP (112041), Choc. Chip CS (102128) and DP(112164), Pink Passion (102762), Kiwi Kiss (111353)
Ink: Choc. Chip (100908)
Tools: Scallop Edge Punch (112091)
Sassy Somethings: Rhinestone Brads, 1" stitched Choc. Chip Ribbon (111849)

Friday, March 6

Snuggle Bunny

The inspiration for today's card is pulled from several different design challenges. The first is KWerner's color challenge #44. I've always been a HUGE fan of pink and brown together. (Just ask anyone who attended my wedding!)


The card layout combines 2 Splitcoast Stampers challenges:
Ways to Use It - Create an Artist Trading Card (WT208)
Limited Supplies - Create a card in 30 minutes or less (LSC210)

The specs for an Artist Trading Card (ATC) are that it be 3.5" x 2.5" -- "a super cute size that is perfect for trading, collecting, and using to create quick cards and tags". I used 2 of my favorite sets: Always and Bundle of Joy. Bundle of Joy is retired, but is one that I just can not let go of... I love these sweet animals. I colored my bunny using pencils and paper stumps for blending. While I made this mini card I was thinking of my sweet baby daughter whom I call "snuggle bunny"... someday she'll be big enough to stamp with me!
When I read that the Limited Supply Challenge today had a time requirement a light went off in my head... "Ohh! I can totally use my ATC from yesterday and design a card around it!" Simple n' Sassy -- say no more!

My card base is a 5.5"Pink Pirouette square with a Close to Cocoa mat. I cut four, 2.5" squares from Pink Pirouette and Chocolate Chip and topped these with yummy paper from the Bella Rose and Chocolate Chip Patterns collections. I like the 'ying and yang' of something soft and subtle combined with something bold. A chocolate chip scalloped edge adds some extra punch. My final (and most delightful) sassy something are the Pink Pirouette buttons that I added to the flowers from Always.

Since I gave you the scoop on my favorite sets, I'd love to know what your favorites are! (current or retired) Leave me a comment... and thanks for looking!

Stamps: Always, Bundle of Joy (retired)
Paper: Pink Pirouette (111351), Chocolate Chip (CS 102128 & DSP 112164 ), Close to Cocoa (101341), Bella Rose DSP (112041)
Ink: Chocolate Chip (100908)
Tools: Scallop Edge Punch (112091)
Sassy Somethings: Button Bouquet (112092)

Thursday, March 5

Feelin' Rosey

I love the change from winter to spring... something just fills my heart with happiness when I can start walking around in flip-flops and sit outside in the evenings with my husband. One of my favorite spring things are the all the beautiful flowers that begin blooming. With those flowers in mind I created today's card: Feelin' Rosey.

My card base is a 5 1/2" x 5 1/2" square of Pink Pirouette layered with Riding Hood Red and some lush Bella Rose Designer Series Paper. (Currently my favorite DSP.) When I layer I typically work in 1/4 inch increments. So, the Riding Hood Red is 5 1/4" square, the DSP 5" inches square. The DSP was ticket punched and Vintage Brads were added for pizazz.

My middle 'stripe' is Kiwi Kiss with another selection of patterned paper from the Bella Rose collection. I love that the Stampin' Up! paper packs always offer a great mix of subtle and bold designs. Ribbon from my stash was added down the center.

The center 'panel' gets all the attention by popping it on Stampin' Dimensionals. My Pink Pirouette base here is 4" square. The Riding Hood Red is 3 3/4" square and the Kiwi Kiss DSP (also part of Bella Rose) is 1/8" smaller. I ticket punched again to create cohesion with my elements.

A Rose is a Rose is an incredible 2-Step Stampin' set. When using my handy Stamp-a-ma-jig it is easy-peasy to align the images one on top of another and get a perfect result. I primarily used Pink Pirouette ink as my base color and layered it with RHRed. For some variation, a few of the base images were stamped in RHRed and layered with Chocolate Chip. The leaves are stamped in Kiwi Kiss and Chocolate Chip. TIP: Don't have all the ink colors you need? Use VersaMark on colored card stock for the Base image and follow up with a darker colored ink on top. The roses are attached to my card with Stampin' Dimensionals and a smaller pop dot that I purchase at my local craft and hobby store. I frequently like to use 2 sizes to create more depth and dimension. Lastly, the sentiment was made by isolating the 'Thank You' portion. (It typically reads: Thank you for touching my life.)

TIP: Here are several ways to isolate parts of a sentiment:
1. Use a Stampin' Write marker to color only the portion you want to stamp. "Huff" the image to add moisture before stamping.

2. Use a trimmed post-it note to cover (mask) the portion you wish to eliminate from the image.

3. Since with this sentiment the portion I wanted to preserve was on the end (not squished in the middle) I carefully inked the 'Thank you' on the edge of a Chocolate Chip Stampin' Spot.

Don't forget: Sale-A-Bration runs through March 31st. NOW is the time to stock up on supplies and to fill your wish list -- ALL while earning FUN FREEBIES!