Tuesday, September 29

Clearance!

Hi friends. 'Life Happens' and things are SO busy right now - I'm hoping to get Halloween Hoop-la up and going SOON... the goal is by tomorrow morning. Until then, a special announcement:

Stampin' Up! has added a CLEARANCE section to the online store! These products are discontinued items that SU! will be offering at a DEEP DISCOUNT. Quantities are limited and available while supplies last. However, new items will periodically be added the the 'Clearance Rack' section of the store, so check back often -- and always make it your last stop when placing an online order. Here's how to shop the clearance:
  • Click the Shop Now button -- or click the Products tab - Shop Now.
  • Left Side Bar: Clearance Rack
NOTE: Snag up these products at great prices, plus place a $50 order on ANY products and qualify for my exclusive Sassy Stampin' promotion. You'll love the NEW Elastic Cord or Shimmer Paint you can earn for FREE!

More details on my promotion can be found in the following post or HERE.

Saturday, September 26

Halloween Hoop-la - A Treat

I'm busy finishing up Halloween treats to share with you this week. We are going to have SO much fun! While you wait, enjoy this sweet treat for all your upcoming holiday crafts:

In conjunction with Halloween Hoop-la,
I am providing an exclusive Sassy Stampin' Offer:

Place an online order with me for $50 or more by Wednesday, September 30th, at 11:59 pm CST and receive your choice from one of these NEW Holiday Mini products:
  1. Elastic Cord - Gold or Silver
  2. Shimmer Paint - Champagne Mist, Frost White, or Platinum
Spend $100 or more in product and receive 2 choices.
TIP: Additional hostess benefits begin at $150.
  • Product total must be $50 or more. (before taxes and shipping)
  • Your free product will arrive separately from your order in mid-October.
Hostess Bonus: For Workshop Orders of $250 or more, you get to choose any item from the Holiday Mini for only $10! (excludes Hostess sets and My Digital Studio)

This is a perfect opportunity to combine a few orders together -- girls at the office, neighbors, family -- and take advantage of this sassy treat!

Need more details about placing a Workshop Order? E-Mail me and we'll create a plan to get you LOTS of FREE goodies!

Thursday, September 24

Fall Wreath PPA9

The colors of fall are some of my favorites. (I'm an Earth Elements kind of girl.) I have a soft spot for changing leaves... could this be attributed to my desire to live in a locale where the leaves actually change? Perhaps. In Texas we just don't have distinct seasons. But I digress... Pals Paper Arts is hosting an Inspiration Challenge this week and the photo is fab:

The elements that inspired me:

I loved the little wooden table and chose to pick up on its texture by grabbing a piece of wood grain printed paper from the Autumn Meadows Designer Series Paper collection. I followed this week's Card Patterns sketch and adhered the pieces with a diagonal split.

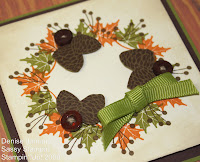
The leaves and pine cones are natural focal points. I opted to create a wreath with these elements. Here's how:
  • Punch a 1.75" Circle (smaller or larger depending on preference) from a Post-It Note. Be sure to get some good sticky surface. This will serve as a 'mask' for the center of your wreath.
  • Use a Stamp-a-ma-jig for perfect placement of your leaves from the Autumn Days stamp set. I started with Old Olive and stamped them around my mask - allowing the stem to stamp onto the mask and therefore be eliminated from my finished wreath.
With the basic outline formed with my Old Olive leaves, I lifted the mask and stamped more leaves in Pumpkin Pie. I tilted the image so that this time the stems remained.

To add 'berry branches' I stuck my mask back down and stamped in Soft Suede. Only the top of the branch remains when the mask is lifted.
  • Pine cones were inked in Chocolate Chip and stamped on Soft Suede card stock, trimmed, and adhered using Stampin' Dimensionals. A few small buttons from my stash dress things us.
  • My bow was added by punching two holes using my Crop-a-Dile and threading 1/4" Old Olive Ribbon through to tie a bow. (just like a shoelace)
A bit of distress ink, a simple sentiment, and a few brads are simple and sassy details.

I hope you'll join us at Pals Paper Arts this week. I can't wait to see how our beautiful fall photo inspires you!

Sassy Stampers:
SHOP ONLINE 24/7

Stamps: Autumn Days (115452)
Paper: Old Olive (100702), Chocolate Chip (102128), Very Vanilla (101650), Autumn Meadows Designer Series (116769)
Ink: Old Olive (102277), Pumpkin Pie (105216), Soft Suede (115657), Chocolate Chip (100908), Distress Ink duo
Tools: 1.75" Circle Punch (112004), Stamp-a-ma-jig (101049), Crop-a-dile (108362)
Sassy Somethings: Vintage Brads (109109), Old Olive 1/4" Ribbon (111368), Buttons

Tuesday, September 22

Just A Note

Hi friends! Just a note to let you know that home life is keeping me busy (and not blogging). A sick babe on the mend and a house that needs a good scrubbing are my priorities this week. A note about a few things to watch for:

Thursday:
Pals Paper Arts will host a
Picture Perfect Inspiration challenge. Join me!

Sunday:
I'll kick off a fun-filled week of Halloween Hoop-la!
Think: projects, prizes, and surprises!

Happy stamping, sassy stampers! ;)

Thursday, September 17

Trendy Minis - PPA8

Now normally I am not a girl to kiss and tell, but I will make an exception today for Pals Paper Arts. We are hosting a K.I.S.S. Challenge - Keep It Simple, Sweetie - and are encouraging you to minimize and enjoy the simpler things in card-making. I'm also popping this card in at Our Creative Corner for their fall challenge. Here are the details for creating a KISS-able card:
  • Clean with lots of 'white' space. (white = negative or un-embellished)
  • Simple designs.
  • Minimum time to create.
  • Limited layers and embellishments.
This is not my strong point. You all know I am a serious lover of layers, bling, and sassy somethings, but this is definitely a nice change - and it is quick! I decided to concentrate on using the Trendy Trees stamp set and whip up a few sweet minis (3" square) for packaging fall goodies.

For my 1st mini, I punched 'hills' from Old Olive card stock using my 1.75" Circle Punch. Using my handy Stamp-a-ma-jig, I added a few trendy trees as well as the sentiment. No layers - no bling - no clutter. KISS!

On my next mini card I grabbed a scrap of the herringbone print from Autumn Meadows Designer Series Paper and layered it onto my card front - leaving a strip for the sentiment along the bottom. Then, I stamped a frame from Great Friend in Dusty Durango as well as a Trendy Tree trunk in Chocolate Chip. Instead of stamping the tree top, I added a few sassy buttons from my stash, snipped it all out, and popped it using Stampin' Dimensionals. KISS!

I hope you'll join us this week at Pals Paper Arts. Whip up a KISS-able creation - cute minis are only one quick and easy idea. Looking forward to seeing your sassy projects!

Sassy Stampers:
SHOP ONLINE 24/7

Stamps: Trendy Trees (113258), Great Friend (113792)
Paper: Very Vanilla (101650), Old Olive (102277), Autumn Meadows Designer Series (116769)
Ink: Chocolate Chip (100908), Dusty Durango (115654), Crushed Curry (115659)
Tools: 1.75" Circle Punch (112004), Stamp-a-ma-jig (101049)
Sassy Somethings: Buttons

Wednesday, September 16

Bella Bleu Bliss

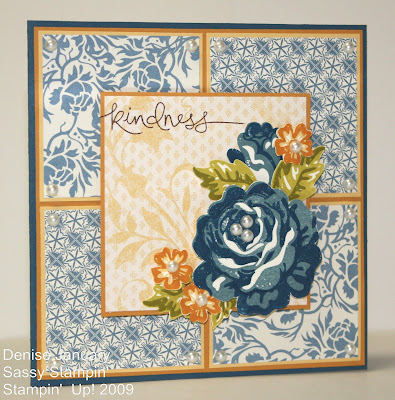
Just a quickie post for you today with a seriously 'wow' card using A Rose is A Rose. In case you don't know, this is my favorite stamp set... my stamping version of comfort food. ;) I combined a few challenges for this little diddy:

Makeesha Byl's Inkspirations Inspiration Challenge (there's a mouthful). I loved the colors from her inspiration photo. This combo of More Mustard, So Saffron, and Not Quite Navy will definitely be reappearing here at Sassy Stampin' - LOVE! (Even my hubby commented how much he liked the colors - usually I just get a standard 'nice, honey').

The layout is from Crazy 4 Challenges. Have you checked them out yet? CRAZY talent and divine design - need I say more?

Off to take care of my simply sweet (but sickly) snot-nosed snuggle bug. Cold season stinks! ;)

Tomorrow: Pals Paper Arts simplifies life with a KISS Challenge. (No, not for your lips - for your stamps, silly!)

Sassy Stampers:
SHOP ONLINE 24-7

Stamps: A Rose Is A Rose (111560), Heard From the Heart (111644)
Paper: Not Quite Navy (101722), More Mustard (100946), So Saffron (105118), Bella Bleu Designer Series (113974), Bella Birds Designer Series (retired)
Ink: Brocade Blue (101102), Not Quite Navy (103008), So Saffron (105213), More Mustard (103162), Kiwi Kiss (retired), Old Olive (102277), Chocolate Chip (100908)
Tools: Stamp-a-ma-jig (101049)
Must-Haves: Stampin' Dimensionals (104430)
Sassy Somethings: Halfback Pearls (not SU)

Sunday, September 13

Vintage Santa

When I saw the Just Beclause stamp set in the NEW Holiday Mini I think my heart skipped a beat. I love things with a bit of a vintage twist lately, and the text print of 'Twas the Night Before Christmas' on Santa's coat really makes my heart flutter. BONUS: At only $14.95 - this set is a steal! This whimsical St. Nick just had to be stamped... he couldn't wait!

The layout for my card is inspired by a sketch challenge at Caardvarks. My Soft Suede card base is 5" x 7" and is layered with a matte of Ruby Red as well as a few polka-dotty prints from The Write Stuff Specialty paper collection. TIP: Using two different sizes of the polka-dot print helps balance the project.

A vertical strip of Chocolate Chip Striped Grosgrain was pleated and added. TIP: When making ribbon pleats there are several ways to give them staying power: 1) Staples. Check your local craft store for staples in all kinds of fun and funky colors. 2) Sewing Machine. 3) Simple Stitch. I use Linen Thread and a sewing needle to add one simple stitch to each pleat. I'm not a seamstress, (i.e. replacing buttons is about as advanced as I get) so this is the easiest way for me.

I stamped Santa onto Kraft in Chocolate Chip ink as well as onto Ruby Red and Soft Suede to paper piece his coat, hat, and sack full o' toys. To complete his outfit I used my Ruby Red Stampin' Write Marker on the sleeves and a white Watercolor Pencil for the trim and beard. I debated coloring the toys, but decided Santa should be the focus.

Santa is layered with Ruby Red and Chocolate Chip. A darling Scallop Edge border and single Playground Button seemed like perfect accents - simple, but sassy. The entire panel is popped using Stampin' Dimensionals.

The sentiment, 'Believe in Santa... just beclause!', was popped using the Modern Label Punch. Two Vintage Brads decorate each side - creating a mod little 'banner'. The brads are echoed in the bottom corner and unify the elements.

Need a Holiday Mini Catalog?
E-mail me and I'll pop your FREE copy in the mail.

Sassy Stampers:
SHOP ONLINE 24/7

Stamps: Just Beclause (116640)
Paper: Soft Suede (115318), Ruby Red (102030), Chocolate Chip (102128), Kraft (102125), The Write Stuff Specialty Designer Series (115674)
Ink: Chocolate Chip (100908), Ruby Red Stampin' Write Marker(100075), Watercolor Pencils (101879)
Tools: Modern Label Punch (116630), Scallop Edge Punch (112091)
Must-Haves: Stampin' Dimensionals (104430)
Sassy Somethings: Chocolate Chip Striped Grosgrain - 1.25" (115617), Linen Thread (104199), Vintage Brads (109109), Playground Buttons (116313)

Thursday, September 10

Sweet Treat

Who doesn't love a little treat? The Sweet Centers stamp set and Sweet Treat Cups make packaging a small treat effortless... with a sweet and sassy result.
  • The layout for today's card is inspired by a new site: Crazy 4 Challenges. Their sketch this week is perfect for a 'tent' card. Typically a tent card refers to making a smaller card base (scored at the top) and then adding an element that rises above that crease. A standard card measures 5.5" x 4.25". If you were to reduce the base to 4" square and then measure to allow your element to 'pop' 1.5" - it would still fit into a standard envelope. Make sense? Because the new Padded Envelopes are a bit larger and perfectly accommodate cards made with Sweet Treat Cups, my Chocolate Chip card base is 5" square.
A layer of Crushed Curry topped with Razzleberry Lemonade Designer Series Paper is just the right mix for fall. Before adhering this layer to my base I used my 1.75" Circle Punch and created a place to pop my Sweet Treat Cup filled with autumn colored buttons... perfect for my crafty friend!
  • I stamped the flower petals from Sweet Centers 10 times - 5 each in Pumpkin Pie and Dusty Durango. I adhered the Pumpkin Pie petals first and then staggered the Dusty Durango petals, using Stampin' Dimensionals. A few Old Olive leaves were added to each side.
  • Pumpkin Pie Striped Grosgrain creates a sassy resting place for my 'Wonderful Friend' sentiment. I used a Stamp-a-ma-jig to achieve precise alignment (no more crooked sentiments!). I love the whimsical font from Wonderful Favorites and the ability to customize a 'just right' personalized sentiment no matter what the occasion.
  • Linen Thread and a button accent mimic my sweet treats and tie everything together. For a little extra something sassy, I added two fluttery darlings from Great Friend. Their butterfly bodies were created by quickly wrapping a small piece of Linen Thread around their torsos.
The Holiday Mini Catalog is filled with sweet stampin' treats and great ideas for holiday crafts. Need a copy? E-mail me, and I'll pop your FREE copy in the mail to you.

Be sure to snag your own Sweet Centers stamp set and Sweet Treat Cups!

Sassy Stampers:
SHOP ONLINE 24/7

Stamps: Sweet Centers (116521), Great Friend (113792), Wonderful Favorites (115114)
Paper: Chocolate Chip (102128). Crushed Curry (115319), Kraft (102125), Razzleberry Lemonade Designer Series (115675)
Ink: Pumpkin Pie (105216), Dusty Durango (115654), Old Olive (102277), Chocolate Chip (100908)
Tools: 1.75" Circle Punch (112004), Stamp-a-ma-jig (101049)
Must-Haves: Sweet Treat Padded Envelopes (116911), Stampin' Dimensionals (104430), Mini Glue Dots (103683)
Sassy Somethings: Sweet Treat Cups (116802), Linen Thread (104199), Pumpkin Pie Striped Grosgrain (115616), Buttons

Blog Candy WINNER

First, have I told you lately how much I love you guys?? You really are the BEST blog readers and virtual stamping friends! I appreciate your sweet sentiments (talk about feeling warm and fuzzy) and am so excited about all the feedback and project ideas you have given me. We've got a LOT to look forward to! A few notes:

Halloween! I will definitely do my best to wow you with some tempting treats and quick projects that can be mass produced. Let's plan a whole week of Trick or Treating here at Sassy Stampin' later this month.

I am also hoping to venture outside of my comfy card zone and tackle a few dimensional projects. Think: tiles, mini albums, and divine decor elements.

You've probably noticed that holiday card ideas have already started to trickle in... that will ramp up as we get closer to the Thanksgiving and Christmas holidays . And don't forget: I have plans to offer a holiday card kit that will make things a snap.

Please know that I'm always available via e-mail if you have more project ideas or questions. I truly love getting to know you all better and getting a feel for the things you love to create.

Now, without further ado, the blog candy WINNER is*:

Roberta

Congrats!
Just send me an e-mail with your mailing address
and I'll pop your prizes in the mail!

*winner chosen using Random.org

Out of the Box - PPA7

Ever get stuck and need a little help to get your crafty mojo kickin'? My favorite solution: a simple sketch. Lucky you: Pals Paper Arts is hosting a Simple Sketch Challenge this week. Pop over and check it out -- better yet, play along!

I love the vintage feel the Out of the Box stamp set provides for this little birthday greeting. (Hostess Level 1) Kraft card stock always seems the perfect fit for a vintage vibe. Add a bit of distressing around the edges and everything starts to feel comfy. ;)

One of my favorite new sentiment sets is FYI. And FYI: I say this ALL the time! Circle punches (1.25" and 1.75") made everything easy while a bit of paper piecing on the cupcake wrappers add a little sass. One darling button accent is the icing of the cake.

Use the Pals Paper Arts sketch to inspire you! And if you want some color inspiration check out this week's Color Throwdown combination: Ruby Red, Pumpkin Pie, and Close to Cocoa. I opted for Chocolate Chip and Kraft. (Hey, if you mixed these two colors together they would be the perfect shade of cocoa! ;) Feel inclined to Pile It On this week? Birthdays are the name of the game... and who doesn't need a great birthday card for their stash?! Wait, wait... one more! Practical Scrappers has a punch challenge this week. Phew! Got 'em all! ;)

Sassy Stampers:
ORDER ONLINE 24/7

Stamps: Out of the Box (Hostess Level 1), FYI
Paper: Ruby Red, Chocolate Chip, Kraft, Always Designer Series (retired), Candy Lane Designer Series (retired)
Ink: Chocolate Chip, Ruby Red, distress ink
Tools: 1.25" and 1.75" Circle Punches, Scallops #2 Bigz Die
Sassy Somethings: Chocolate Chip Felt Ribbon (retired), Playground Buttons

Tuesday, September 8

Butterfly Garden

I'm venturing out of my comfort zone today and into more mod territory. My inspiration comes from 2 challenges: Stamps and Smiles sketch teamed with The Pink Elephant color challenge: red, yellow, black and white. (specifically for me Ruby Red and Crushed Curry)
  • My card base is textured Basic Black (scored to 5" x 7") layered with Ruby Red and a subtle text print from Night and Day Specialty Designer Series Paper. TIP: This set of bold black and white prints also includes 2 polka-dotted window sheets. Ooh-la-la!
  • A strip of Crushed Curry Patterned Paper is combined with a sassy scallop to create a quick border. Black and white ribbon from my stampin' stash adds texture.
  • The sentiment is from Lovely Labels (retired). It was punched using the 1.25" Circle Punch and layered atop a 1.75" black circle as well as a Ruby Red scalloped circle.
My fluttery friends are from the Great Friend stamp set. The black butterflies sparkle in the sun with a layer glitter. Here's how: I stamped the butterflies in StazOn ink and sprinkled Heat and Stick Powder on immediately after stamping. Using my Heat Tool I quickly melted the powder until it was tacky and then added my glitter. Gently folded wings paired with Stampin' Dimensionals make these beauties 'pop' from my card front... a modern butterfly garden, don't you think?

Tomorrow: Join me for a Simple Sketch Challenge
at Pals Paper Arts.

Sassy Stampers:
SHOP ONLINE 24/7

Stamps: Great Friend (113792), Lovely Labels (retired)
Paper: Ruby Red (102030), Textured Neutrals - 12x12 astd. (108693), Crushed Curry Patterns (115686), Night and Day Specialty Designer Series (116768)
Ink: Crushed Curry (115659), Ruby Red (102259), StazOn (101406)
Tools: 1.75" (104401) and 1.25" (104403) Circle Punch, Scallop Circle Punch
Must-Haves: Heat and Stick Powder (100625), Heat Tool (100005), Stampin' Dimensionals (104430)
Sassy Somethings: Dazzling Diamonds Stampin' Glitter (102023)

Monday, September 7

Blog CANDY

Following a week of ribbon ideas and quick tutorials - are you feeling inspired to try something new? I would love feedback on projects YOU would like to see featured on Sassy Stampin'. Is there a particular technique, special stamp set, or favorite product that you would like to see me demonstrate or create? I'm all yours! No really, I am. ;)

Leave a comment on this post about what you would love to see here -- and ya know, maybe a sweet sentiment to make me smile.

You've got until Wednesday, September 9th at midnight to leave a comment - I'll announce the winner here on Thursday morning.

But, Denise... what IS the blog candy?? Ohh gosh, I almost forgot to tell you! (I got distracted by my daughter hollering her baby head off in the other room.) Up for grabs:


Bella's Bloom Stamp Set and
Manhattan Flowers Impressions Folder

And don't forget:
TODAY is the LAST day to take advantage of my
exclusive FREE Ribbon Promotion.

Place an online order with me for $40 or more in product by Tuesday, September 8th, at 11:59 pm CST and receive your choice of a FREE roll of Ribbon. (up to $8.95 value) Spend $100 or more in product and receive two rolls of Ribbon.* TIP: Additional hostess benefits begin at $150. CLICK HERE for more details.

Sassy Stampers:
SHOP ONLINE 24/7

Saturday, September 5

Ribbon Reminder


Just a quick reminder that my exclusive FREE Ribbon Promotion is continuing through the holiday weekend. Don't miss out on the opportunity to add some fabulous ribbon to your stampin' stash!

Place an online order with me for $40 or more in product by Tuesday, September 8th, at 11:59 pm CST and receive your choice of a FREE roll of Ribbon. (up to $8.95 value) Spend $100 or more in product and receive two rolls of Ribbon.* TIP: Additional hostess benefits begin at $150.
  • Product total must be $40 or more. (before taxes and shipping)
  • E-mail me your choice of ribbon by Wednesday, September 9th. (*pg. 182-183 of the Stampin' Up! Idea Book and Catalog, value of each spool up to $8.95)
  • Your free ribbon will arrive separately from your order in mid September.
Sassy Stampers:
ORDER ONLINE 24/7

Thursday, September 3

Ribbon Blossoms

Our wonderful week of ribbon continues at Sassy Stampin' with Ribbon Blossoms. Earlier in the week I demonstrated how to create Ribbon Ruffles using Double-Stitched ribbon. Today, we are going to use the same technique to make sassy blossoms. Need a review of the Ribbon Ruffle technique? Click here.

Cut your ribbon to 12-16" in length. Pull the stitching from the same side on both ends - creating the 'scrunch'. The ribbon will naturally start to curve inward.
Be sure that the entire length of ribbon has a tight scrunch. Then, using the excess thread that you pulled, tie a tight knot. (similar to bow tying - but just a knot) You should have a 'donut'. Trim the excess thread. You may also want to tuck your ends for a neater presentation. I do this by simply creating a little fold and tacking it with a few Mini Glue Dots. (my fingers get in the way if I try to photo it ;) TIP: You can gently shape your flower but too much tugging may result in pulling out the knot.

More card details:
  • The inspiration for my layout today comes from Our Creative Corner's sketch challenge as well as The Pink Elephant challenge. For Pink Elephant we had to use: 2 squares, 1 ribbon, and something shiny. Check, check, and check!
  • My Melon Mambo card base is 5.5" square and is layered with Rich Razzleberry as well as Razzleberry Lemonade Designer Series Paper. To separate the 2 prints I added a scallop edge.
  • The main panel is Rich Razzleberry with a slim matte of Crushed Curry. The Razzleberry was textured using an embossing folder.
  • The leaves are from the Central Park stamp set. A pair of super sharp scissors are a necessity when you're doing detailed trimming. Paper Snips are my favorite go-to. TIP: If you ever get 'gunk' on your scissors from adhesive, you can use nail polish remover to clean them.
  • A combination of Mini and Pop-Up Glue Dots were used to adhere my flower layers and So Saffron button. I really nestled the button down into the center section to encourage the ribbon to 'poof' up.
  • The 'thank you' sentiment with butterfly from Oval All seemed perfect for this blossoming beauty. I snipped it out and framed it with Hodgepodge Hardware for extra sass. (and something shiny)
Ready to make your own Ribbon Blossoms?
Take advantage of my exclusive Ribbon Promotion.
CLICK HERE for all the details.

Sassy Stampers:
ORDER ONLINE 24/7

Stamps: Central Park (113732), Oval All (113790)
Paper: Melon Mambo (115320), Rich Razzleberry (115316), Crushed Curry (115319), Razzleberry Lemonade Designer Series (115675)
Ink: Chocolate Chip (100908), Old Olive (102277)
Tools: Paper Snips (103579), Swiss Dots Embossing Folder, Apron Lace Punch
Must-Haves: Mini (103683) and Pop-Up Glue Dots (104183)
Sassy Somethings: Rose Red (111846) and Chocolate Chip (111849) Double-Stitched Ribbon, Hodgepodge Hardware - currently available in Styled Silver (111325) or Styled Vanilla (112454), Button Latte (114333)

Linen Thread - PPA6

Pals Paper Arts is hosting a Color Challenge this week: Ruby Red, Crushed Curry, and Brocade Blue. Everyone is welcome to participate and to substitute colors as necessary... even I had to sub a bit this week - replacing Brocade Blue with Bordering Blue (both part of the Stampin' Up! Rich Regals color family). These colors are rich and reminiscent of a brisk fall evening.

My card's layout is inspired by this week's sketch at Card Positioning Systems. The details:
  • My Ruby Red card base is 6" square. (I found some large vellum envelopes at my local craft store that perfectly accommodate larger cards.) A layer of Crushed Curry and a Ruby Red print from Autumn Traditions Designer Series Paper provide the backdrop.
  • For my main panel I stamped the tree from Season of Friendship in Chocolate Chip onto Very Vanilla and used my Stamp-a-ma-jig to add fall leaves in Crushed Curry and Chocolate.
  • Two thin mattes of Bordering Blue and Crushed Curry highlight the tree image. My 3/16" Corner Rounder made things interesting by only punching 2 opposing corners.
  • Instead of using ribbon today I opted for Linen Thread. I love the organic feel that this thread lends projects. In addition, it is the perfect go-to product for tying through button holes. At only $4.50 for 15 yards, you should definitely add it to your order! To wrap it around my panel I tacked down one end with adhesive, wrapped, and tacked the finished end. So simple but also SO sassy! For a little extra ooh-la-la, I tied on a Playground Button.
  • The entire tree panel is popped using Stampin' Dimensionals. I zipped a piece of Bordering Blue through my Big Shot using the Matchbox Bigz XL Die. Not only does the Matchbox Die produce adorable favors, it also creates 3 functional (and fashionable) labels.
  • I stamped the Season of Friendship sentiment into the label - attaining perfect placement by once again using my Stamp-a-ma-jig. The snippets of swirl were added with a stamp from Season of Joy. (It was still hanging around on my craft desk from yesterday. ;)
Come play along with us at Pals Paper Arts!

Sassy Stampers love to Shop!
ORDER ONLINE 24/7

Stamps: Season of Friendship (111776), Season of Joy (110384)
Paper: Ruby Red (102030), Crushed Curry (115319), Bordering Blue (102630), Very Vanilla, Autumn Traditions Designer Series (115668)
Ink: Chocolate Chip (100908), Crushed Curry (115659), Brocade Blue Stampin' Write Marker (100064)
Tools: 3/16" Corner Rounder (109047), Stamp-a-ma-jig (101049), Matchbox Bigz XL Die (114890)
Sassy Somethings: Linen Thread (104199), Playground Buttons (116313)

Tuesday, September 1

The Perfect Bow

I've gotten several requests to demonstrate my bow making technique. This is one of the ways that I like to create bows - especially for cards that need to be mailed because the result isn't too "poofy".
Apply Sticky Strip where you plan for your ribbon to be placed. Here it is the 'seam' where the 2 patterns meet. Leave a small gap without adhesive. (see where I'm pointing) Remove the backing ONLY from the long piece of sticky strip and adhere your ribbon.

For the bow, cut a strip of ribbon and apply adhesive to one end. For a medium bow I used a 7" strip of 5/8" cream grosgrain. Next, adhere the two ends together and create a circle.


Grab your thread (baker's or button twine) and a sassy button.
Thread both ends through the button holes, keeping a loop of thread.

Slide your button loop onto your ribbon strip to the place where there is no adhesive. Also slide your ribbon circle into place. Tighten the thread (the middle should 'scrunch') and tie in a tight knot against the button. Remove the backing from the remaining Sticky Strip and tack your excess ribbon down - tucking the end over the edge for a clean and neat presentation. Trim your excess thread and 'voila!' - a sassy bow!

My snowy hills were made using the 1.75" Circle Punch and trimming them to line up with the bottom edge. A few halfback pearls accent the trees and are the perfect sassy something to finish up this simple card.

This Christmas cutie also meets the 'requirements for this week's Pile It On Challenge - Think Spots and Dots. It is based on the sketch that I found at Stamps and Smiles as well as a great example for this week's Practical Scrappers challenge. FOUR challenges - WOW!

I hope you'll play along with us at Color Throwdown this week - I can't wait to see what you create!

Holiday Mini & FREE Ribbon!

The Stampin' Up! Holiday Mini Catalog is bursting
with inspiration, holiday products,
and stampin' necessities.

Click the Catalog Cover to Download and Browse
Still need a hard copy to hold in your hot little hands?
E-mail me and I'll pop one in the mail to you pronto.

In conjunction with the debut of the Holiday Mini Catalog, I am also providing an exclusive Sassy Stampin' Offer:

Place an online order with me for $40 or more in product by Tuesday, September 8th, at 11:59 pm CST and receive your choice of a FREE roll of Ribbon. (up to $8.95 value) Spend $100 or more in product and receive two rolls of Ribbon.* TIP: Additional hostess benefits begin at $150.
  • Product total must be $40 or more. (before taxes and shipping)
  • E-mail me your choice of ribbon by Wednesday, September 9th. (*pg. 182-183 of the Stampin' Up! Idea Book and Catalog, value of each spool up to $8.95)
  • Your free ribbon will arrive separately from your order in mid-September.
Hostess Bonus: For Workshop Orders of $250 or more, you get to choose any item from the Holiday Mini for only $10! (excludes Hostess sets and My Digital Studio)

This is a perfect opportunity to combine a few orders together -- girls at the office, neighbors, family -- and take advantage of this sassy treat! (I've got my eye on the Pop-Up Tree.)

Need more details about placing a Workshop Order? E-Mail me and we'll create a plan to get you LOTS of FREE goodies!

Please Note: My Digital Studio and Simply Adorned are currently not available for purchase. As soon as they are available (projected to be later this month) I will announce it here.


Tomorrow:
Another Ribbon Technique
Plus, A Special Surprise